


Framing a window might seem like a daunting task, but with the right guidance, you can accomplish it with precision and skill. Whether you're tackling new construction or a home renovation project, learning how to frame a window will not only improve your home's aesthetics but also its energy efficiency. In this exhaustive guide, we'll walk you through every step of the process, from preparation to the final touches. Grab your tools and let's get started!
Understanding the Basics of Window Framing
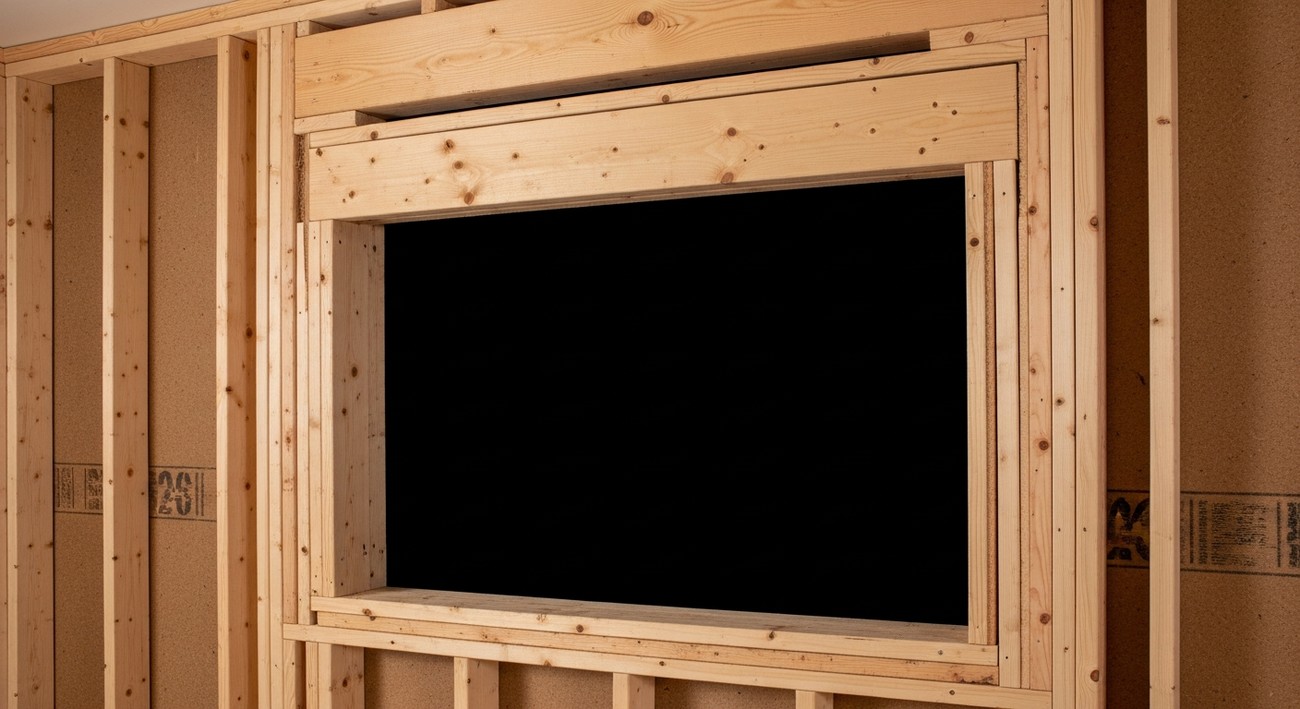
Before diving into the practical steps, it's important to understand the basic structure of a window frame. The window frame is integral to both function and form, supporting the window and enhancing your home's insulation. A properly framed window consists of several key components:
- Header: This is the top part of the frame that provides structural support.
- Sill: The bottom horizontal part of the frame that bears the weight of the window.
- King Studs and Trimmer Studs: Vertical components that form the sides of the window opening.
- Cripple Studs: These provide additional support between the header and top plate.
Essential Tools and Materials
To start framing your window, you'll need to gather some essential tools and materials:
- Measuring tape
- Level
- Saw (circular or hand saw)
- Hammer
- Nails or screws
- Lumber (2x4s are standard for most homes)
- Safety goggles
- Pencil
- Square
Preparing the Workspace
A well-prepared workspace contributes significantly to the success of your project. Here’s how to get started:
- Clear the Area: Ensure your workspace is free of clutter and obstacles. This will give you ample room to work safely and efficiently.
- Gather Safety Gear: Always wear safety goggles and gloves to protect yourself from flying debris and sharp edges.
- Inspect Your Lumber: Check your 2x4s for any signs of warping or damage to ensure stability when framing.
Measuring and Marking the Window Opening
Accurate measurements are crucial when framing a window. Here’s how to measure and mark for precision:
- Determine Window Size: Measure the exact dimensions of your window. Add a half-inch to these measurements for the rough opening to allow space for shimming and adjustments.
- Mark the Opening: Use a pencil and measuring tape to mark the window opening on the wall framing. Remember to double-check your measurements to prevent mistakes.
Cutting the Framing Components
Now that your opening is marked, it’s time to cut the framing components:
- Cut the Header: Measure and cut two pieces of lumber for the header using a saw. These should be the width of your opening plus the width of two king studs.
- Cut the Sill: Cut a piece for the sill using the width of your opening.
- Cut the Studs: Measure and cut the king studs and trimmer studs. The king studs should be full-height pieces, and trimmer studs run from the bottom of the sill to the header.
Assembling the Frame
With all components cut, it’s time to assemble the frame:
- Install the King Studs: Secure these vertically on either side of the window opening with nails or screws.
- Attach the Header: Place the header on top of the trimmer studs and nail it into the king studs.
- Position the Sill: Fit the sill across the bottom of the opening, securing it with nails into the trimmer and king studs.
- Install the Cripple Studs: Measure, cut, and place cripple studs underneath the sill up to the existing wall plate to provide additional support.
Finalizing the Window Frame
Your window frame is now coming together, but a few critical steps remain:
- Check Level and Plumb: Use a level to ensure all components are perfectly horizontal and vertical. Make any necessary adjustments to achieve a perfect fit.
- Secure All Joints: Go over each connection and reinforce with additional nails or screws for maximum stability.
Tips for Success
- Use Quality Lumber: The best results come from using straight, high-quality lumber for your frame.
- Double-Check Measurements: Mistakes are costly, so verify all measurements before cutting.
- Stay Safe: Always wear protective gear and follow safety protocols to prevent accidents.
Enhancing Energy Efficiency
After completing the framing, consider enhancing your window's energy efficiency:
- Install weatherstripping around the window to minimize drafts.
- Use spray foam or caulk to seal any gaps between the frame and the wall.
Frequently Asked Questions About Framing a Window
What tools do I need for framing a window?
To effectively frame a window, you'll need a set of essential tools. A measuring tape is crucial for ensuring precise dimensions, while a carpenter's pencil comes in handy for marking your cuts. A circular saw, or a handsaw if you prefer, will allow you to cut the lumber pieces to the right size. Don't forget a hammer or, better yet, a nail gun for assembling the frame. A level will help ensure everything is straight, and a square can keep your corners at right angles. Lastly, safety equipment like goggles and gloves will protect you while you work.
How do I measure a window opening for framing?
Measuring the window opening accurately is vital for a snug fit. Start by measuring the width at three points: top, middle, and bottom. Use the smallest measurement for your frame width. For the height, measure in three spots on the left, center, and right sides, and use the smallest measurement here as well. Always account for a half-inch smaller on both dimensions to allow for some flexibility in installation. Don't forget to account for the rough opening dimensions set by the window manufacturer when you're learning how to frame a window.
What type of wood should I use for framing a window?
Choosing the right type of wood is a crucial step in window framing. Generally, you should use pressure-treated lumber for any exterior framing, as it is resistant to moisture and insects. For interior window frames, common choices include pine, fir, or hemlock, as these are durable and easy to work with. Consider purchasing kiln-dried lumber to reduce the chance of warping over time. Whatever type you choose, ensure the wood is straight and free of significant knots or defects.
How do I construct the frame for a window?
Constructing the actual frame involves cutting and assembling the lumber. Begin by cutting the header, which spans the top of the frame, and the sill plate, for the bottom. The king studs run vertically on each side, with the trimmer studs supporting the header. Nail the pieces together, starting with the header and trimmers, followed by the sill and king studs. Secure the frame with nails or screws, ensuring everything is level and square as you go. This step is the core of learning how to frame a window.
What is the purpose of a window header in a frame?
The window header is a critical component in framing because it bears the load above the window opening, distributing it evenly to the sides of the frame. This helps maintain the structural integrity of the building. The header is usually made of a thicker piece of lumber or two boards sandwiched together for added strength. Its correct installation is crucial, as an improperly supported window may lead to sagging or structural issues over time.
How do I ensure the window frame is level and square?
Ensuring that the window frame is level and square is essential for both the function and appearance of the window. Use a carpenter's level on all horizontal pieces, including the sill and header, to make sure they are perfectly horizontal. Similarly, use a square to check that all corners form perfect right angles. Adjust any pieces as necessary by tapping with a hammer or adding shims. This careful attention to detail will make a significant difference in the overall look and performance when you frame a window.
What are common mistakes to avoid when framing a window?
Common mistakes in window framing can lead to issues like air leaks or structural weakness. One frequent mistake is not measuring accurately, which can result in an ill-fitting frame. Skipping the use of a level and square may lead to a misaligned frame that causes problems with window operation. Using inappropriate lumber, such as wood that isn't moisture resistant for exterior work, can lead to premature decay. Lastly, neglecting to consult local building codes can result in a frame that doesn't meet safety regulations.
How do I incorporate insulation into a window frame?
Insulating a window frame is important for energy efficiency and comfort. Once the frame is assembled and before you install the window, fill the gaps between the frame and opening with insulation. Use spray foam insulation around edges for a tight seal, but be careful not to overfill, as it can expand and bow the frame. An alternative is using fiberglass batt insulation cut to size. Proper insulation will help reduce heat loss and can keep your home more comfortable, especially in extreme weather.
What should I do if I encounter termites or rotting wood during window framing?
If you discover termite damage or rotting wood while framing a window, address these issues promptly to maintain the structural health of your home. Remove all affected wood, even beyond what appears visibly damaged, to ensure you eliminate all compromised material. For termites, consider treating the area with a pesticide designed for termites, and consult a professional if necessary. Replace the old wood with new, pressure-treated timber to prevent future problems. These steps are crucial for a stable and durable window frame.
Step-by-Step Guide
Tools/Materials Needed
To frame a window effectively, you will need the following tools and materials:
- Measuring tape
- Carpenter's level
- Hammer
- Circular saw or hand saw
- Power drill
- Framing nails or screws
- Wood shims
- Lumber (usually 2x4s or specific size as per design)
- Safety goggles and gloves
- Pencil or marker
- Pry bar (for any necessary demolition)
- A stud finder (if applicable)
Preparation Steps
Safety First: Before starting any construction project, ensure you wear safety goggles and gloves to protect yourself from stray nails, wood splinters, and dust.
Get Permissions: Check with your local building authority to ensure your project complies with any building codes, and obtain the necessary permits if required.
Clear the Area: Remove any furniture, curtains, or personal items from around the working area to have room to move and to prevent damage.
Measure and Mark: Use the measuring tape to measure the dimensions of your window opening. Mark these dimensions on the wall ensuring they align with your design plans. Double-check your measurements for accuracy.
Locate Studs: With a stud finder or by tapping and observing sounds, locate the nearest wall studs where the window frame will be attached.
Detailed Instructions
Cut the Opening: Using your circular or hand saw, carefully cut the drywall along the lines you've drawn. Be cautious of any wiring or plumbing that might be in the walls.
Remove Existing Framing or Obstacles: If there’s any existing framing in the way, like drywall or old windows, use a pry bar to remove them gently.
Build the Header: For the top structure, cut a piece of lumber to the width of your window opening. Nail it securely between the studs to form the top part of the frame. Double up the wood for extra strength if your window is noticeably wide.
Install King Studs: Place pieces of lumber vertically called king studs, these will be the side supports of your frame. Secure them with nails or screws to the existing wall studs.
Fit the Cripples: These are smaller vertical boards that go below and above the window to give extra support. Place them evenly spaced across the frame, attaching them to the header and to the sill.
Build and Install the Sill Plate: The sill is the bottom horizontal part of the frame. It needs to balance durability with a flat level to support the window. Nail it into place between the studs and ensure it's perfectly level using your carpenter's level.
Add Trimmers/Jack Studs: Nail these shorter boards on either side of the window opening to support the ends of the header and keep everything leveled.
Install the Window: Once the frame is secure, you can place your window within the new frame. Use wood shims to adjust the fit and ensure everything is level and plumb before securing the window with screws.
Check Level and Plumb: Use a level to make sure the window is neither tilted forward nor backward in the frame. Adjust accordingly with shims.
Seal and Insulate: Once the window is in place, seal the edges with a quality insulation material or sealant to avoid drafts.
Tips for Success
- Measure Twice, Cut Once: Always double-check all your measurements before making any cuts to avoid mistakes.
- Take Your Time: It's better to go slowly and do the job correctly than to rush and make errors.
- Proper Use of Shims: These are critical for adjusting the window to ensure it’s level.
What to Do If Something Goes Wrong
- Misaligned Frame: If your frame is off by a slight amount, use shims and adjust accordingly. For major misalignments, it may be necessary to disassemble part of the frame and make precise cuts or adjustments.
- Window Won't Fit: Check if it's the frame or the window that has inaccurate measurements. You might need to trim the opening or the window if permissible.
- Water or Air Leaks: Seal any gaps with caulk or weatherstripping to prevent leaks.

Common Mistakes to Avoid
Mistake 1: Incorrect Measurements
Why it happens: Often, excitement or eagerness leads to jumping into cutting materials without double-checking measurements. A simple measuring error can compound into more significant issues down the line.
How to avoid it: Double-check every measurement before making any cuts—always. A good rule of thumb: measure twice, cut once. Also, using the same tape measure throughout the project ensures consistency.
What to do if you've already made the mistake: If you've ended up with material that's too short, you may need to purchase new supplies and start from scratch for those particular segments. If it's too long, a simple recut can solve the issue.
Expert recommendation: Use a quality measuring tape and mark clearly with a pencil. Avoid relying on memory; write down dimensions for everything.
Mistake 2: Choosing the Wrong Materials
Why it happens: Opting for less expensive or incorrect materials can occur when people are trying to cut costs or don't understand the specific needs of their project.
How to avoid it: Consult with a professional or do thorough research on the best materials for your specific climate and window type. Ensure what you choose is durable and suited for your conditions.
What to do if you've already made the mistake: If the materials aren't yet installed, return them if possible. If installed, you might need to replace them sooner than anticipated, so plan strategically for this.
Expert recommendation: Don’t compromise on quality, particularly for exterior framing materials. An investment in high-quality products can save money and effort in the long run.
Mistake 3: Ignoring Level and Plumb
Why it happens: It's easy to overlook the importance of a level frame, especially when dealing with irregular surfaces or when tools are lacking.
How to avoid it: Always use a level and plumber's line when installing window frames. This ensures stability and functionality, avoiding drafts or improper operation of the windows.
What to do if you've already made the mistake: If the frame is not level or plumb, it will need to be adjusted. Depending on the level of deviation, you might need to re-shim or even reframe entirely.
Expert recommendation: Invest in a good quality level and use it frequently throughout the installation process. Don’t rush this step.
Mistake 4: Improper Sealing
Why it happens: Overlooking sealing or using the incorrect type of sealant can lead to air and water leaks, primarily due to underestimating the importance of this step.
How to avoid it: Use appropriate sealant and follow the manufacturer's instructions closely. Ensure all gaps are sealed correctly and double-check your work.
What to do if you've already made the mistake: Consider resealing around the window with the correct materials. A careful inspection can usually pinpoint problem areas, which can then be addressed.
Expert recommendation: Consult a construction specialist if unsure about what products to use. Continuous education on new products can save future hassle.
Mistake 5: Not Considering Water Management
Why it happens: Focusing only on visual and basic structural elements can lead to neglecting water drainage considerations, resulting in leaks.
How to avoid it: Install flashing properly and ensure the sill is slightly sloped to direct water away from the window. This proactive step will help you avoid future issues.
What to do if you've already made the mistake: If water issues arise, you may need to remove sections of the frame to reinstall flashing and correct the problem.
Expert recommendation: Frequent inspections and maintenance can prevent future water issues; understanding the dynamics of water flow and management in the area of installation is crucial.
Mistake 6: Underestimating the Skill Required
Why it happens: Many DIY enthusiasts dive into projects without gauging the skill and tools needed, which is a natural pitfall for the over-enthusiastic beginner. How to avoid it: Assess your skill level realistically before starting. Consider hiring a professional if the project seems daunting or labor-intensive. What to do if you've already made the mistake: Don’t hesitate to call a professional if the situation becomes unmanageable. Sometimes rectifying a DIY error requires expert intervention.
Final Thoughts
Framing a window might seem daunting at first, but with the right steps and a bit of patience, it's a rewarding project that can enhance your home’s appeal and functionality. Whether you’re replacing old frames or installing new ones for better insulation and aesthetics, knowing how to frame a window gives you the power to transform your space.
If you're feeling unsure about tackling this on your own or simply want some professional guidance, we're here to help. As a trusted local expert serving homeowners in Seattle, WA, GotRot is ready to assist you with any framing project. Reach out to us to schedule a consultation or request a free estimate, and let's get your windows looking fantastic!


